
ashley bed assembly instructions
Welcome to the comprehensive guide for assembling your Ashley bed. This manual provides clear, step-by-step instructions to ensure a smooth and successful assembly process. Whether you’re a DIY novice or experienced, this guide covers everything from safety precautions to final stability checks, helping you create a sturdy and stylish bed with ease.

Safety Precautions and Preparation
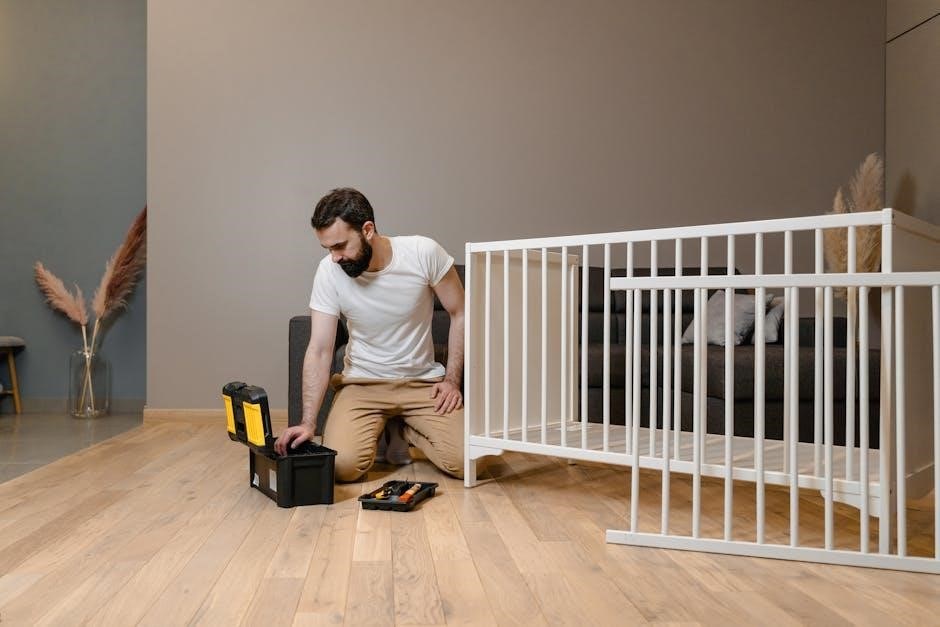
Ensure safety and proper assembly by following these precautions. Always use proper tools, follow steps in order, and check for small parts. Two-person assembly may be required.
Important Safety Notices
Read all instructions carefully before starting. Use proper tools to avoid damage or injury. Follow each step in order without skipping. Check for loose small parts in packaging. Two-person assembly is required for stability and safety. Failure to follow instructions may result in damage or injury. Ensure a clear workspace and keep children away. Proper assembly ensures product longevity and safety. Always tighten bolts securely and test stability post-assembly. Adhering to these guidelines ensures a safe and successful assembly process.
Tools and Materials Required
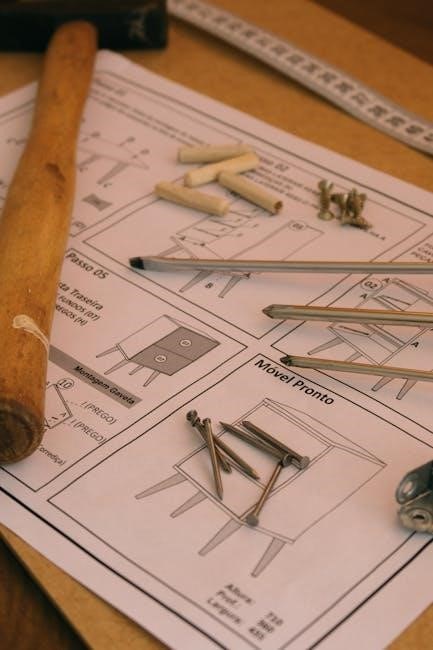
Ensure you have all necessary tools and materials before starting. Common tools include an Allen wrench, screwdriver, and pliers. Check the packaging for hardware like bolts, screws, and washers. Additional materials such as a rubber mallet or measuring tape may be helpful. Verify all parts are included and undamaged. Proper tools ensure accurate assembly and prevent damage to components. Double-check the parts list provided in the manual to confirm everything is accounted for. Having everything ready streamlines the assembly process and avoids delays.
Workspace Preparation
Prepare a clean, flat, and spacious workspace to ensure efficient assembly. Clear the area of obstacles and cover the floor with a protective cloth or old sheets to prevent damage. Gather all parts, tools, and instructions within easy reach. Ensure good lighting to avoid mistakes. Lay out components like headboards, footboards, and slats in an organized manner. Double-check that all items are included and undamaged. A well-prepared workspace minimizes clutter and helps you stay focused, making the assembly process smoother and less stressful.

Understanding the Parts and Hardware
Familiarize yourself with the components, including headboard, footboard, slats, and support panels. Hardware like bolts, screws, and Allen keys are essential for secure assembly. Proper identification ensures accuracy and avoids delays during the process.
Parts List and Identification
Your Ashley bed assembly kit includes essential components like the headboard, footboard, slats, support panels, and hardware such as bolts, screws, and Allen keys. Begin by carefully unpacking and organizing all parts. Refer to the provided parts list to identify each item, ensuring no components are missing or damaged. Proper identification and organization are crucial for a smooth assembly process. Cross-reference each part with the manual to confirm its purpose and placement. This step ensures accuracy and prevents delays during assembly. Take your time to verify all items before proceeding.
Hardware Components and Their Functions
Your Ashley bed assembly requires specific hardware, including bolts, screws, Allen keys, and cam locks. Bolts are used to secure major frame components, while screws attach slats and support panels. Allen keys are essential for tightening adjustable parts, such as bed slat supports. Cam locks ensure stability by firmly connecting the headboard and footboard to the bed frame. Each hardware piece plays a critical role in ensuring structural integrity and stability. Always use the correct hardware for each step to avoid damage or instability. Organize hardware beforehand to streamline assembly. Proper use guarantees a sturdy and durable bed frame.

Step-by-Step Assembly Guide
Start by assembling the headboard and footboard, then attach the bed frame and support legs. Next, install slats and panels, securing them tightly. Use Allen keys and bolts to ensure stability. Follow the sequence carefully for a successful assembly.
Assembling the Headboard and Footboard
Begin by attaching the headboard legs using the provided Allen key and bolts. Ensure proper alignment and tighten securely. Next, align the footboard with the headboard, connecting them using the triangle support panels. Use the JCBC bolts to fix the slats and supports. Double-check all connections for stability and ensure no hardware is loose. Follow the sequence carefully to avoid misalignment. Properly securing these components is essential for the bed’s structural integrity and safety.
Attaching the Bed Frame and Support Legs
Attach the side rails to the headboard and footboard using the JCBC bolts and Allen key. Ensure proper alignment before tightening. Secure the support legs to the side rails, following the sequence outlined in the manual. Use the triangle support panels to reinforce the frame. Tighten all bolts firmly to ensure stability. Double-check the alignment and levelness of the bed frame before proceeding. Properly securing these components is crucial for the bed’s stability and safety.
Installing the Slats and Support Panels
Begin by placing the slats evenly across the bed frame, ensuring they align with the pre-drilled holes. Secure each slat using the provided bolts, tightening them firmly with the Allen key. Next, attach the support panels to the side rails and center rail for added stability. Ensure all connections are snug and properly aligned. Refer to the manual for specific bolt counts and torque specifications. Double-check the slats and panels for tightness to guarantee a sturdy base for the mattress.
Securing the Bed Slat Supports
After placing the slats, locate the slat supports and position them evenly between the side rails. Use the JCBC bolts and Allen key to secure each support to the bed frame; Tighten the bolts in a star pattern to ensure even pressure and prevent warping. Double-check that all supports are firmly attached and aligned properly. This step is crucial for maintaining the bed’s stability and preventing sagging. Ensure no movement is detected before proceeding to the final tightening phase.
Final Tightening and Stability Check
Once all components are assembled, re-tighten all bolts and screws to ensure maximum stability. Start with the headboard and footboard connections, then move to the side rails and slat supports. Use the Allen key to apply even pressure, ensuring no bolts are overtightened. Perform a final stability check by gently rocking the bed and checking for any wobbling or movement. If instability is detected, review the connections and tighten as needed. A stable bed ensures safety and long-lasting durability. Double-check all hardware for proper securement before use.
Common Challenges and Solutions
Addressing misaligned parts, missing hardware, and instability ensures a sturdy bed. Tighten loose connections, replace damaged components, and ensure all slats are securely fastened for optimal stability.
Troubleshooting Misaligned Parts
If parts appear misaligned, double-check their orientation against the manual. Ensure all bolts and screws are properly tightened but not over-tightened. Use an Allen key to adjust slats or supports. Verify that hardware like JCBC bolts and Allen keys are correctly applied. If alignment issues persist, disassemble the problematic section and reassemble it step-by-step. Consult the parts list to confirm no components are missing or damaged. Proper alignment is crucial for stability, so take your time to ensure accuracy during assembly.
Dealing with Missing or Damaged Hardware
If hardware is missing or damaged, refer to the parts list in the manual to identify the specific item. Contact Ashley customer support or visit their official website to order replacement parts using the model and serial number. Do not proceed with assembly until the correct hardware is obtained, as this could compromise safety and stability. Always verify the integrity of all components before use to ensure a secure and proper assembly process.
Addressing Wobbling or Instability
If the bed wobbles or feels unstable, start by checking all connections and bolts. Ensure they are tightly secured, especially the slat supports and frame attachments. Verify that all slats are properly aligned and evenly spaced. If instability persists, inspect the support legs for levelness and adjust them on uneven surfaces. Finally, double-check that no hardware is missing or loose. A sturdy assembly ensures long-term durability and safety. Refer to the manual for specific tightening procedures if needed.
Post-Assembly Checks and Maintenance
After assembly, ensure all bolts are securely tightened and test the bed’s stability. Regularly inspect for loose hardware and clean surfaces to maintain durability and appearance.
Ensuring All Bolts Are Secure
After completing the assembly, review the entire bed to ensure all bolts and screws are tightened firmly. Refer to the manual for specific torque recommendations. Use an Allen wrench or screwdriver to double-check all connections, especially at joints and slat supports. Pay extra attention to the headboard, footboard, and frame attachments. Re-tighten any loose bolts to prevent instability. Regularly inspect and tighten hardware over time to maintain structural integrity and ensure long-term stability and safety.
Testing the Bed for Stability
Once assembled, gently rock the bed to check for any wobbling or movement. Ensure the bed is on a level surface and adjust the legs if necessary. Place weight evenly across the bed to test its sturdiness. Check that all slats are secure and the frame is stable. If using a mattress, ensure it fits properly and does not cause the bed to sag. Repeat the process with increasing weight to confirm stability, ensuring a safe and sturdy sleeping surface.
Cleaning and Maintaining the Bed
Regularly dust the bed using a soft, dry cloth to prevent dust buildup. For tougher stains, dampen the cloth slightly with water, but avoid soaking. Use a mild detergent solution if necessary, testing on a small area first. Condition wooden beds with appropriate furniture conditioner to maintain appearance. Protect from direct sunlight to prevent fading. Polish occasionally to enhance finish, but avoid over-polishing. Check and tighten hardware periodically. Store lightweight items under the bed, avoiding overloading. Avoid harsh chemicals and address scratches promptly with touch-up products.
Additional Tips and Resources
Explore optional enhancements, find replacement parts, and access official manuals for a seamless assembly experience. Visit Ashley Furniture’s website for comprehensive resources and support.
Optional Enhancements and Customizations
Personalize your Ashley bed with optional enhancements like under-bed storage drawers or decorative trim. Add lighting kits for ambiance or install fabric upholstery for a custom look. Consider upgrading hardware for a modern aesthetic. For tech enthusiasts, integrate USB ports or wireless charging pads. These customizations elevate functionality and style, ensuring your bed reflects your unique preferences. Always follow manufacturer guidelines and safety precautions when modifying your bed.
Where to Find Replacement Parts
To find replacement parts for your Ashley bed, refer to the official Ashley Furniture website or contact their customer service. Many online retailers like Amazon or Wayfair also carry compatible hardware. Check the manual for specific part numbers to ensure accuracy. If unavailable, consider reaching out to local furniture stores or suppliers. Always verify compatibility before purchasing to avoid mismatches. For convenience, some parts can be ordered directly through Ashley’s official online portal or authorized dealers.
Accessing Official Assembly Manuals
To access official Ashley bed assembly manuals, visit the Ashley Furniture website and navigate to the support or customer service section. Many manuals are available for free download in PDF format. You can also contact Ashley’s customer service directly for assistance. Additionally, websites like ManualsLib or ManualsOnline host a wide range of Ashley Furniture assembly guides. Ensure the manual matches your specific bed model for accuracy. Some manuals may also be found on the product’s packaging or via a QR code linked to the instructions. Always verify the source for authenticity.
Successfully assembling your Ashley bed requires careful attention to detail and adherence to the provided instructions. Take pride in your accomplishment and enjoy your new, sturdy bed!
Final Thoughts on Successful Assembly
Completing your Ashley bed assembly is a rewarding experience. Ensure all parts are securely fastened and double-check for stability. Take pride in your accomplishment, knowing your bed is built to last. Proper preparation, patience, and attention to detail are key to a successful assembly. Remember to test the bed’s stability before use and store leftover hardware safely. With these steps, you’ll enjoy a comfortable and durable sleeping solution. Happy assembling!
Importance of Following Instructions
Adhering to the provided assembly instructions is crucial for ensuring the bed’s stability and safety. Properly following each step prevents misalignment, wobbling, and potential damage to the structure. Skipping steps or ignoring safety notices can lead to unsafe conditions, such as instability or collapse. Always use the recommended tools and hardware to avoid compromising the bed’s integrity. By carefully following the guide, you ensure a secure and durable final product, providing years of reliable service. Attention to detail is key to a successful and stress-free assembly experience.
About Ashley Furniture
Ashley Furniture is a renowned global leader in home furnishings, offering stylish, high-quality products that blend innovative design with exceptional craftsmanship and affordability for every lifestyle.
Overview of Ashley Furniture Industries
Ashley Furniture Industries is a global leader in furniture manufacturing and design, offering a wide range of home furnishings. Founded in 1945, Ashley has grown into one of the largest furniture companies worldwide, known for its commitment to quality, innovation, and sustainability. The company produces stylish and functional pieces for every room, with a focus on affordability and durability. Ashley’s dedication to excellence has made it a trusted name in the furniture industry, catering to diverse customer needs and preferences.
Why Choose Ashley Furniture?
Ashley Furniture is a trusted brand offering high-quality, stylish, and durable home furnishings. Known for its innovative designs and commitment to affordability, Ashley provides a wide range of products to suit various tastes and needs. With a strong focus on customer satisfaction, Ashley ensures that its furniture is both functional and aesthetically pleasing. Additionally, the brand emphasizes sustainability and ethical practices, making it a responsible choice for consumers. Ashley’s reputation for excellence and reliability makes it a preferred option for those seeking long-lasting, beautiful furniture solutions.