granada guide book
Granada, a city in southern Spain, captivates visitors with its rich history, vibrant culture, and breathtaking landmarks like the Alhambra. A must-visit destination, it blends Moorish elegance with Spanish charm, offering a unique cultural experience.
Why Granada is a Must-Visit Destination in Spain
Granada captivates visitors with its unique blend of Moorish elegance and Spanish charm. As a UNESCO World Heritage city, it boasts iconic landmarks like the Alhambra, Generalife, and Albaicín. The city’s rich history, vibrant culture, and breathtaking architecture make it a standout destination in Spain. From the serene Islamic gardens to the lively flamenco music, Granada offers an unforgettable cultural experience. Its strategic location near the Sierra Nevada mountains and the Costa Tropical adds to its allure, making it a perfect blend of history, nature, and tradition. A visit to Granada promises an enchanting journey through time and beauty.
Overview of Granada’s Unique Landmarks and Attractions
Granada is renowned for its breathtaking landmarks, with the Alhambra being its crown jewel. This UNESCO World Heritage site, along with the Generalife Gardens and the historic Albaicín neighborhood, showcases the city’s Moorish heritage. The Alhambra’s intricate architecture and serene gardens reflect Islamic elegance, while the narrow streets of Albaicín offer charming views of the Alhambra. Granada’s unique attractions also include its vibrant markets, traditional tapas bars, and the Sierra Nevada mountains nearby. These landmarks and experiences make Granada a city where history, culture, and natural beauty seamlessly converge, creating a visual and historical treasure unlike any other.
Historical Background of Granada
Granada’s rich history dates back to Moorish rule, leaving a lasting legacy in its architecture and culture. The Alhambra stands as a testament to this golden era.
The Moorish Influence and the Alhambra
Granada’s Moorish influence is epitomized by the Alhambra, a breathtaking palace and fortress. Built in the 14th century, it reflects Islamic architecture’s grandeur with intricate arches, serene gardens, and ornate calligraphy. The Alhambra served as a royal residence and symbol of power during Moorish rule. Its design blends seamlessly with the surrounding landscape, creating a harmonious balance of nature and art. Today, it stands as a UNESCO World Heritage Site and a cornerstone of Granada’s cultural identity. Visiting with a guide enhances the experience, offering deeper insights into its history and significance.
Granada’s Role in Spanish History
Granada played a pivotal role in Spanish history, particularly as the last Moorish stronghold in the Iberian Peninsula. Its strategic location and cultural significance made it a focal point during the Reconquista. The city’s fall to the Catholic Monarchs in 1492 marked the end of Moorish rule and the unification of Spain. Granada’s rich history is reflected in its architecture and traditions, blending Islamic and Christian influences. This cultural fusion has made Granada a cornerstone of Spain’s heritage, attracting visitors and scholars alike to explore its historical depth and architectural marvels.
UNESCO World Heritage Sites in Granada
Granada is home to three UNESCO World Heritage Sites: the Alhambra, Generalife, and Albayzín. The Alhambra, a stunning Islamic palace complex, showcases intricate architecture and gardens. The Generalife, its summer gardens, offers serene landscapes. Albayzín, the historic Moorish district, features narrow cobblestone streets and breathtaking views of the Alhambra. These sites reflect Granada’s rich cultural legacy, blending Islamic and Christian influences. They are must-visit attractions, attracting millions annually. Booking tickets in advance is essential to explore these iconic landmarks fully.

Top Attractions in Granada
Granada’s top attractions include the breathtaking Alhambra, the serene Generalife Gardens, and the historic Albaicín neighborhood, offering a blend of Moorish architecture, natural beauty, and cultural richness.
The Alhambra: A Detailed Guide
The Alhambra, a UNESCO World Heritage Site, is Granada’s crown jewel. This stunning complex of Moorish palaces and gardens showcases Islamic architecture at its finest. Explore the Alcazaba fortress, the intricate Nasrid Palaces, and the serene Generalife Gardens. Tickets must be booked in advance, as the site is highly sought after. A private guide enhances the experience, offering deep insights into its history and symbolism. The Alhambra’s intricate stone carvings, reflecting pools, and aromatic gardens create a magical atmosphere. It is a testament to Moorish craftsmanship and a must-visit for history and architecture enthusiasts.
Exploring the Generalife Gardens
The Generalife Gardens, a lush oasis within the Alhambra complex, offer a serene escape. Designed as a summer retreat for Moorish rulers, these gardens blend natural beauty with Islamic architectural elegance. Stroll through the meticulously manicured terraces, adorned with vibrant flowers and herbs. The sound of flowing water from intricate irrigation systems adds to the tranquil ambiance. The gardens’ design reflects the Moorish appreciation for nature and symmetry. Visitors can explore the narrow pathways, courtyards, and scenic viewpoints, making it a perfect spot to relax and absorb the historic charm of Granada’s iconic landmark.
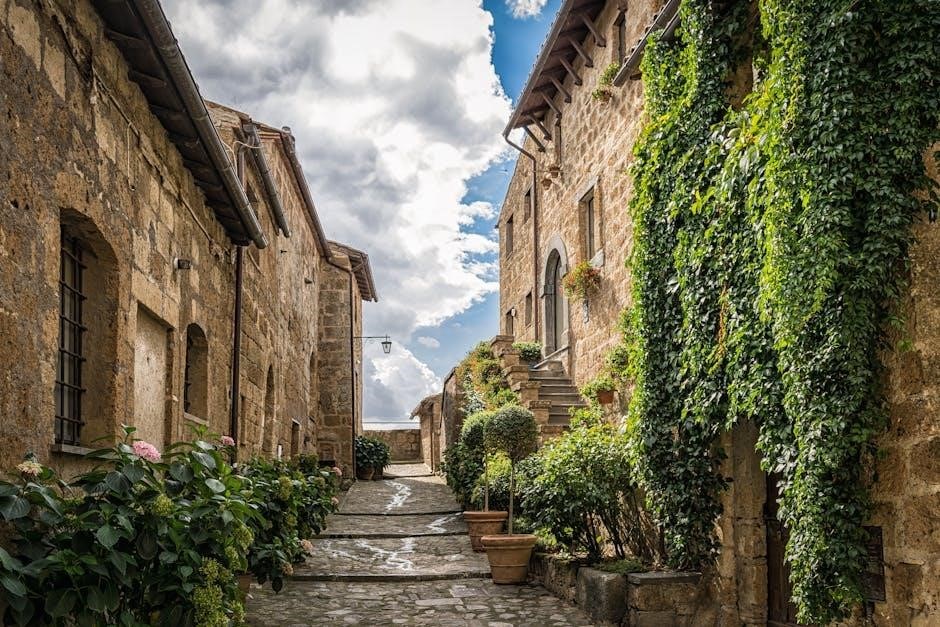
The Albaicín Neighborhood: A Historic District
The Albaicín, a UNESCO World Heritage Site, is a historic neighborhood perched on a hill opposite the Alhambra. Its narrow, cobblestone streets and whitewashed houses evoke a timeless charm. Once a Moorish quarter, it retains much of its Islamic architectural legacy. The Mirador de San Cristóbal offers stunning views of the Alhambra and the city. As you wander, discover hidden plazas, quaint shops, and authentic flamenco music. The Albaicín is a living museum of Granada’s rich cultural tapestry, blending Moorish and Spanish influences in a captivating setting that invites exploration and reflection. Its unique ambiance makes it a must-visit destination for any traveler.
Cultural Experiences in Granada
Granada offers a vibrant mix of flamenco music, traditional tapas, and lively markets, showcasing its rich cultural diversity and passionate spirit. Immerse yourself in its artistic and culinary heritage.
Flamenco Music and Dance
Flamenco, a soulful expression of Andalusian culture, thrives in Granada. Experience passionate performances in intimate venues, such as caves in the Sacromonte district or traditional tablao bars. The city’s deep-rooted gypsy heritage makes it a hotspot for authentic flamenco. Attend a mesmerizing show to witness the emotional dance, powerful vocals, and intricate guitar melodies. Many tours and guidebooks recommend booking tickets in advance, as these performances are a highlight of Granada’s cultural scene. Let the rhythm and energy of flamenco captivate your senses during your visit.
Traditional Tapas and Local Cuisine
Granada is a paradise for food lovers, offering a rich culinary experience rooted in Andalusian tradition. Indulge in delicious tapas, a staple of local culture, often served free with drinks. Savor classic dishes like tortilla española, gazpacho, and jamón ibérico. Explore the narrow streets to discover authentic tapas bars, where each bite tells a story of regional flavors. Don’t miss local specialties like habas con jamón or espinacas con garbanzos. Pair your meal with a glass of local wine or a refreshing tinto de verano. Granada’s cuisine is a perfect blend of tradition and innovation, making every dining experience unforgettable.
Granada’s Vibrant Markets and Shopping
Granada’s bustling markets and charming shops offer a unique shopping experience. The historic Alcaicería, once a silk market, now features vibrant souvenirs and local crafts. Explore the lively Mercado de San Agustín for fresh produce and regional delicacies. Discover traditional Andalusian products like handmade ceramics, intricate textiles, and aromatic spices. Don’t miss the opportunity to shop for unique jewelry and leather goods. Evening shopping in areas like Calle Navas combines retail therapy with tapas bars, creating a lively atmosphere. Granada’s markets blend tradition and modernity, making them a shopper’s delight.

Day Trips and Excursions
Explore beyond Granada with day trips to the Sierra Nevada Mountains for hiking, the Alpujarra region for traditional villages, and the Costa Tropical for beaches and seafood.
Visiting the Sierra Nevada Mountains
The Sierra Nevada Mountains offer a stunning escape from Granada, with breathtaking landscapes and outdoor activities. Hike through lush forests, enjoy panoramic views, and explore traditional villages. In winter, the Sierra Nevada Ski Resort provides excellent skiing opportunities, while summer invites trekking and horseback riding. Visit the picturesque villages of La Zubia and Monachil to experience local culture and cuisine. The mountains are also home to rare flora and fauna, making them a nature lover’s paradise. Whether you seek adventure or tranquility, the Sierra Nevada Mountains promise an unforgettable experience.
Exploring the Alpujarra Region
Nestled in the foothills of the Sierra Nevada, the Alpujarra region captivates visitors with its charming villages, breathtaking landscapes, and rich cultural heritage. Whitewashed villages like Pampaneira, Bubión, and Capileira perch on steep hillsides, offering stunning views and a glimpse into traditional Andalusian life. Hike the ancient trails, explore terraced farmlands, and discover the region’s unique history. The Alpujarra is also known for its literary connections, as it inspired writers like Gerald Brenan. Enjoy local cuisine, including hearty stews and locally-grown produce, for an authentic experience in this picturesque corner of Granada.
Discovering the Costa Tropical
Costa Tropical, Granada’s coastal gem, offers a serene escape with its pristine beaches, crystal-clear waters, and charming fishing villages. Explore Almuñécar and Salobreña, where Mediterranean charm meets tropical vibes. Enjoy water sports, hiking trails, and breathtaking views of the Sierra Nevada. Savor fresh seafood and local wines, immersing yourself in the region’s laid-back atmosphere. A hidden gem compared to busier Spanish coasts, Costa Tropical promises tranquility and natural beauty, perfect for those seeking relaxation and authentic coastal experiences in southern Spain.

Hidden Gems of Granada
Discover Granada’s lesser-known museums, secret gardens, and local festivals. Explore hidden courtyards and unique cultural experiences that reveal the city’s authentic charm beyond its famous landmarks.
Lesser-Known Museums and Galleries
Granada’s hidden cultural gems include lesser-known museums and galleries that offer unique insights into its artistic and historical heritage. The Archaeological Museum showcases ancient artifacts, while the Fine Arts Museum houses an impressive collection of Spanish art. For a more niche experience, explore indie galleries in the Realejo district, where local artists display contemporary works. These spots provide a refreshing contrast to the city’s more famous attractions, allowing visitors to delve deeper into Granada’s creative soul. Don’t miss the opportunity to discover emerging talents and lesser-known masterpieces in these understated cultural spaces.
Secret Gardens and Courtyards
Granada’s secret gardens and courtyards are hidden gems that reveal the city’s intimate beauty. Tucked away in the Albaicín district, these tranquil spaces offer a serene escape from the bustling streets. The Generalife Gardens, while famous, boast lesser-known sections with lush greenery and fragrant flowers. Private courtyards, adorned with traditional Andalusian tiles and fountains, provide a glimpse into the region’s Moorish heritage. Exploring these spots during spring, when flowers bloom, is a must for a truly enchanting experience. Guided tours often uncover these secret oases, allowing visitors to appreciate Granada’s artistic and natural splendor.
Local Festivals and Events
Granada comes alive with vibrant festivals that showcase its rich cultural heritage. The Flamenco Festival highlights the passionate art of Andalusian music and dance, while the Fiesta del Corpus Christi offers a spectacle of traditional processions and colorful decorations. Summer evenings are magical with outdoor concerts and cultural events at the Alhambra, illuminated under the stars. These gatherings reflect the city’s deep-rooted traditions and its lively spirit, making them unforgettable experiences for visitors seeking authentic local charm and community connection.

Practical Information for Visitors
Plan your itinerary with guidebooks, book tickets in advance for popular sites, and explore transportation options to navigate Granada’s historic streets efficiently.
Best Time to Visit Granada
The best time to visit Granada is from April to June and September to October, when mild temperatures and blooming flowers create ideal sightseeing conditions. Spring offers vibrant gardens, while autumn brings harvest charm. Summer can be hot, but evenings remain pleasant. Winters are cooler but still enjoyable for exploring indoor attractions. Plan ahead by booking tickets for popular sites like the Alhambra in advance, especially during peak seasons. Consider visiting during shoulder seasons for smaller crowds and lower prices, ensuring a more relaxed and memorable experience in this historic city.
Where to Stay in Granada
Granada offers diverse accommodations to suit every traveler’s needs. The historic Albaicín district provides charming stays with breathtaking views of the Alhambra, while Sacromonte is ideal for peaceful retreats. For convenience, the city center offers hotels and hostels near main attractions. Luxury options abound in modern areas like Realejo, with upscale amenities. Budget-friendly guesthouses and B&Bs are plentiful, offering authentic local charm. Booking in advance is highly recommended, especially during peak seasons. Consider stays with balcony views to fully appreciate Granada’s picturesque landscapes and vibrant atmosphere, ensuring a memorable experience in this enchanting city.
Getting Around the City
Granada’s compact size makes it easy to explore on foot or by bike, with many attractions within walking distance. The city boasts an efficient public bus network, including routes like C1 and C2, connecting the center to outer areas. Taxis are readily available and affordable for shorter trips. Bike rentals are another popular option, allowing visitors to navigate cobblestone streets and scenic paths. The Alhambra is accessible via public transport or a short drive; With its well-connected streets and scenic views, Granada is a city where every mode of transport enhances the journey and the overall experience.
Family-Friendly Activities
Granada offers engaging experiences for families, including interactive museums, kid-friendly tours of the Alhambra, and outdoor adventures in the Sierra Nevada, ensuring fun for all ages.
Kid-Friendly Tours of the Alhambra
The Alhambra offers specially designed tours for children, making history and architecture engaging through interactive experiences. Knowledgeable guides craft storytelling and hands-on activities to captivate young minds. These tours are tailored to keep kids entertained while exploring the palaces and gardens. Private guides are highly recommended for a personalized experience, allowing families to move at their own pace. Advanced booking is essential due to high demand. These tours ensure that even the youngest visitors can appreciate the beauty and history of this iconic landmark, creating unforgettable memories for the whole family.
Interactive Museums for Children
Granada’s interactive museums offer engaging experiences for children, blending education with fun. The Science Park Museum features hands-on exhibits that spark curiosity in science and technology, while the Granada Museum of Fine Arts provides family-friendly workshops. These spaces are designed to inspire creativity and learning through interactive displays and activities. Perfect for families, these museums ensure kids have an enjoyable and enriching experience, making them a great addition to any Granada itinerary.
Outdoor Activities in Granada
Granada offers a variety of outdoor activities for all ages. Explore the Sierra Nevada mountains for hiking and trekking, or visit the Generalife Gardens to enjoy nature and architecture. Stroll through the Albaicín neighborhood, with its narrow streets and scenic views. Families can also visit local parks and outdoor spaces, perfect for relaxation and play. These activities provide a refreshing way to experience Granada’s natural beauty and cultural charm.
Book Recommendations for Granada
Discover Granada through Tales of the Alhambra by Washington Irving and South from Granada by Gerald Brenan. Explore guidebooks, historical novels, and stunning photography books capturing the city’s essence.
Guidebooks for Planning Your Trip
For a seamless journey, consider Granada City Travel Guide 2024, offering insights into historic wonders and coastal gems. Granada in 3 Days provides detailed itineraries, dining tips, and money-saving strategies. These guidebooks include practical advice on navigating the city, booking tickets, and exploring hidden gems. They feature comprehensive maps, transportation tips, and highlights of must-visit attractions like the Alhambra. Whether you’re a first-time visitor or a seasoned traveler, these guides ensure a well-planned and memorable trip. Available in stores and online, they are essential companions for discovering Granada’s charm.
Historical Novels Set in Granada
Immerse yourself in Granada’s rich past through novels like Tales of the Alhambra by Washington Irving, which weaves legends and history around the iconic palace. South from Granada by Gerald Brenan offers a vivid portrayal of life in the Alpujarras during the early 20th century. These books provide a deeper understanding of the city’s cultural and historical tapestry, blending fiction with real-life events. Perfect for travelers seeking to connect with Granada’s soul, these novels highlight the city’s enduring allure and its significance in Spanish history. They are ideal companions for exploring the Alhambra and beyond.
Photography Books of Granada
Capture the essence of Granada through stunning photography books that showcase its iconic landmarks and hidden gems. From the intricate architecture of the Alhambra to the vibrant streets of the Albaicín, these books offer a visual journey through the city. Many feature breathtaking shots of the Generalife Gardens and the Sierra Nevada backdrop. Some highlight Granada’s cultural richness, including flamenco performances and bustling markets. These books are perfect for photographers and travelers alike, providing inspiration and a lasting memento of Granada’s timeless beauty. They beautifully encapsulate the city’s unique blend of history, nature, and artistry.
Granada, a city where Moorish legacy meets Spanish charm, captivates with its iconic Alhambra and Generalife. Plan your visit with this guidebook to explore its rich history and vibrant culture.
Final Tips for Making the Most of Your Visit
Plan ahead by booking Alhambra tickets in advance to avoid long waits. Consider a private guide for a deeper historical insight. Visit during spring (April–June) or autumn (September–October) for ideal weather. Explore beyond landmarks—wander through Albaicín and Sacromonte for authentic charm. Don’t miss local tapas and festivals for a taste of Granada’s vibrant culture. Use public transport or walk to navigate the city’s narrow streets. Lastly, capture stunning views from miradores like San Nicolás for unforgettable memories of this captivating city.